Welcome to Dawn’s Creative Crafts blog

Hello! My name is Dawn and WELCOME to my craft blog.

I enjoy a wide variety of arts and crafts, from crochet to card-making, jewelry to cross-stitch and more.
Arts & crafts used to be a hobby to me. But now I have a passion to share what I make with the crafting world.

My love of crafts started when I was a child. I always loved to doodle, sketch, and draw. I took many art classes in high school.
As a teenager I began learning how to cross-stitch, work with plastic canvas, and started making beaded jewelry. I always loved rubber stamping, which turned into a love of making personal stationery and card-making.
I studied Graphic Design & Black and White Photography while attending vocational school, and continued my studies in Graphic Design at college.

I worked in retail for several years, as well as performing Customer Service duties. I’ve worked in Discount retail stores as a photo lab technician in the 1-hour photo lab, enhancing my love of Photography. I think my favorite job next to photo lab tech was when I worked in a small local craft store.
While working there I took tole painting classes, saw Bob Ross painting classes, and found 2 more crafts I thought i’d enjoy; paper quilling (paper filigree) & pysanky/pysanky. I have done some quilling and I do enjoy it. I also have some pysanka supplies, but have yet to try it. I believe I would also enjoy quilting, and cake decorating.

I relish crafting so much that I’ve thought about turning it into a small business. Time will tell.
I’m thankful for my God-given gifts & talents. I certainly couldn’t do the things that I do without Him.
Please don’t think that I’m bragging. I’m not perfect by any means. I am usually pleasantly surprised with how my projects turn out.

I am the vine, you are the branches. He who abides in Me, and I in him, bears much fruit; for without Me you can do nothing.” John 15:5 (NKJV)

A daily crafter is a happy crafter!

Season’s Greetings!

I hope this bog post finds you safe and healthy.

So yeah… it’s been a while, eh? Instead of copying and pasting re-writing my post from my main blog, allow me to link it here.

Among the adventures mentioned in the aforementioned post, I have been learning and doing a fair bit as far as my creativity is concerned.
Since 2019 I have been doing some new things, including: creative bullet journaling, learning brush and pointed pen calligraphy, and also learning watercolor painting. I’ve also done some drawing and doodling, but ever since Covid-19’s appearance it seems my artistic mojo has gone on a bit of a vacation. It’s quite frustrating at times. However, I’m not giving up, nor am I giving place to creative block. Even if I’m not physically doing something creative, I’m still fueling my creativity by watching and learning from videos on YouTube and Skillshare.

Speaking of Skillshare, you can get a month for free by clicking here.
No, I am not an instructor nor am I affiliated with them. It’s just my gift to you.

I have been learning Calligraphy from Becca of The Happy Ever Crafter and have enjoyed every minute of it! If you’d like to learn, you can sign up for her free introductory course here; the new semester begins in January. Becca is clever, fun and is very detailed in her teaching.
Here is a piece I did, shortly before our final course ended. It’s not perfect, as I’m still learning and growing, but it’ll get better with time.

Brush Pen: Tombow Fudenosuke (Hard Tip)

And in closing, here are a couple watercolor pieces I did recently.

Watercolor Christmas Bear — Tutorial by Ellen Crimi-Trent (YouTube)
Supplies I used:
Paints: Winsor & Newton and Grumbacher
Brushes: W&N Cotman 6 & 12 round; Princeton 0 round
Paper: Strathmore hardbound watercolor journal 400 series (8.5″x11″/21,6×27,9 cm) 140 lb./300 g/m2
Tutorial
Christmas Ornaments (My own idea)
Supplies I used:
Paints: Winsor & Newton and Grumbacher
Brushes: W&N Cotman 6 round; Princeton 4 round
Paper: Canson Watercolor journal (5.5″x8.5″/13,9×21.6 cm) 90 lb./185 g

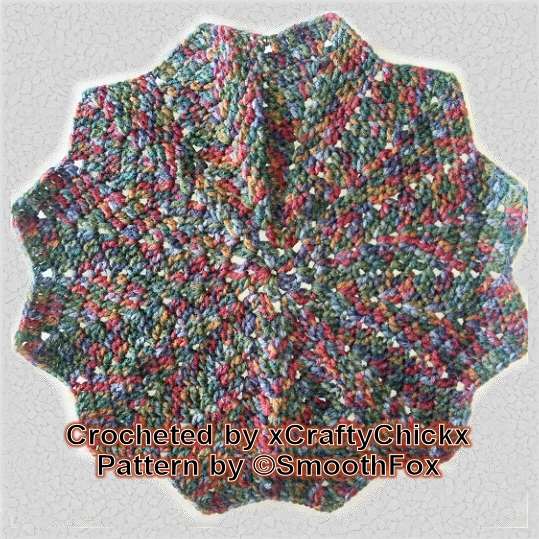
Round Ripple Cat Blanket

About a year ago, before my bout with tennis elbow, I had been searching for ideas for crochet blankets. I wanted to make blankets for our fur babies.
In my search I found several blanket patterns, but most didn’t fit the idea in my mind.

I found a craft blog with a round blanket.
I tried it, but it wouldn’t stay flat; it curled up on one side.
I frogged it and tried again.
Same result.
I tried two more times…
(RIPPIT!!  RIPPIT!!)
Again, same result each time.

Ok time to find some help.
So I asked a crochet group I’m a member of on FB for help.
A few said I might have been crocheting tightly. Others suggested the pattern might have been written with the increases in the wrong places.
Either way I’m not sure. So I gave up on that pattern after trying one more time crocheting a bit more loosely and getting the same result.

I continued searching and found a site with a round ripple pattern.
Round ripples are really pretty, but they looked difficult to me.
I had never crocheted a ripple before, let alone a round ripple.
I accepted the challenge to try it.

Guess what?

I enjoyed working on this pattern. It was easy to follow and it turned out nice.
My favorite part? I think it could be an original idea.
(Probably not).
I have never seen a ripple, especially a round ripple, with only variegated yarn, but that’s what I did.

The pattern is by SmoothFox and can be found on her website here.
You can also find SmoothFox on the Ravelry website.

Here is the Blanket I made.
Sorry there is nothing else in the photo to compare it to.
It’s 12 rounds and measures 17 1/2″ across, so it’s fairly small.
But hey, it’s a nice size for our Tuxedo Tabby, Bear.

roundripplecatblanket_zpsn7uuki5a
Photo taken with my LG G Stylo; edited with “Jasc Paint Shop Pro 8”
(Paint Shop Pro is now ownded by Corel)

The yarn is by Red Heart “Williamsburg”
worsted weight 10 ply (9 wpi).
I used less than one skein/ball. And I used an I/9-5.5mm hook.

I started this blanket June 2015, worked on it for about a week before getting side-tracked by 2 other projects (including Terbert). And then tennis elbow set in.
I was originally wanting to make the blanket about 24″, but when I picked it up to continue working on it today, I decided it was fine like it was and finished it off.
It was then presented to Bear with a little catnip treat.

I haven’t picked up a crochet hook since March, but I’m getting back into things again.
Crocheting is definitely not a summer craft for me–my internal temperature always runs on the hot side and I very much dislike temperatures above 75°F (23.8°C). I am happy we have air conditioning, especially with the crazy heat we’ve been having here in NJ.
Today was 99°F (37°C) with the heat index reaching 107° (41°C).
I’m glad that Autumn is around the corner. I’d like to get started early(ier) on Christmas goodies this year. (I think I found some patterns for softies that my kids will enjoy. YIPPEE!)

Happy Crafting!

[Amigurumi] A Family of Terberts

Several weeks ago I finished my first ever amigurumi plushie: TERBERT*.

I crocheted two more Terberts for my kids. I would have posted sooner, but for the past 3 weeks I have been dealing with “Tennis Elbow” in my dominant arm.

My daughter wanted hers lavender with a mint green eye & aqua snaggle-tooth. My son wanted his red with a blue eye and 2 snaggle-teeth. He also wanted me to make an add-on… a chicken drumstick!!

As promised I am posting more photos. So, without further ado, meet the Terbert Family!

Terberts #3 and #2

The Terbert Family

*Note: Terbert pattern is by Delight Iverson of Denver Whimsy Crochet

[Amigurumi] Terbert

Last week I made my first ever amigurumi creature. It was pretty easy and fun to make. His name is Terbert.

I know what you’re thinking, “Terbert?! What in the world is a Terbert?”

Well… he’s a cute little monster with 2 arms, 2 legs, ears, a tail and one large eye. Terbert was created by Delight Iverson aka Denver Whimsy. She hosted a 5-day CAL (Crochet-A-Long) with her pattern.

I decided to try and make one. Although I enjoy making hats, scarves and other things, I have been wanting to try an amigurumi project. And… I think I’m hooked.

For me, Terbert was an experiment. I wanted to be sure I could make it without too much fuss and with as few mistakes as possible. (I am a perfectionist after all). So, I was thinking if I could successfully complete it, I would make one for both of my blessings, if they wanted one.

~~~~~~~~~~~~~~~~~~~~~~~~~~~~~~~~~~~~~~~~~~~~~

I went with hunter orange as the main color, and camo green for the eye. (Hey, what can I say? My husband is a hunter/fisherman, so I had those colors handy).

My kids, especially my daughter, were anxiously awaiting the results with each step.

Two legs? Done! Two arms? Yup! Two ears? Can you hear me now?!

My daughter would squeal with aww’s and “cute!” and run to get her brother with each new part completed.

Tail? check! Eye? I see it! And the body. Done! Time to stuff and sew.

Result:

The pattern doesn’t include the snaggle tooth; that was my addition. Some of the other CAL participants added other things like a hair bow or a tongue sticking out.

My daughter kept saying, “He’s so adorable!” She has snuggled with him every night since I made him.

Both kids have said that they want one and have chosen their colors and ‘add-ons’. In fact, I finished my daughter’s last night–she renamed hers: Sarah. I’ll be starting on my son’s today.
(I’ll post more photos later).

[Product Review] Darice Sock Friends

I have two friends I’d like to introduce you to today. Say Hello to Shark & Flower (No, you don’t really have to say hello).

Darice Sock Friends

Shark and Flower were sent to us from my mom as craft projects for my two blessings. I am grateful for my parents help and gifts, especially for the kids, but I have to be honest. I’m a little disappointed with the product.

Each kit included:

1 sock (puppet body) Foam or material shapes (some adhesive some not depending on the kit) Google eyes Pom Poms Adhesive tabs Instructions

As cute as Shark and Flower are, there are a few flaws. First, the instructions said, and I quote: “Using photo as a guide, assemble project using the self-adhesive tabs included.” Shark instructions also said, “Peel and stick remaining shapes to character.” My kids are 7 and almost 10. Using a photo as a guide isn’t very helpful to the younger one. (Oh yeah, the package said for ages 6+).

Second, those adhesive tabs & parts that came with them… Flower did not come with adhesive parts except for the adhesive tabs. (that was fine) The adhesive tabs were a pain to try and use. They stuck to ME instead of what they were supposed to stick to. (not fine) Shark came with adhesive parts, which worked fine, but again the adhesive tabs were a nuisance.

My daughter has wanted me to help make her puppet since we got them. After seeing how the tabs worked, or didn’t, I opted for the hot glue gun. Not having written directions threw me for a loop at first glance, because I am a detail person, and a perfectionist to boot. But they turned out alright, I think.

Shark & Flower — Sock Puppets by Darice

They are cute, but with the flaws I would rate Darice Sock Friends with:

I wonder if Flower was one of Darice’s first created Sock Friends as Shark had better adhesive that was already attached to some of the character pieces.
They are a cute craft for kids. I don’t know if they’re worth the price, as they were a gift and the price is unknown. If you do decide to get one (or two) that use adhesive tabs… GOOD LUCK! You could always opt for craft glue or a hot glue gun.

Dream BIG… Again

May 11, 2010
Dawn’s Creative Crafts: The Dream begins

A dream begins with a single thought or idea.
It continues growing day by day.

Until… hardship strikes?

Originally Dawn’s Creative Crafts facebook page was created in 2011. Two years later, after much thought and difficulty I made a hard decision and closed the entire account down. I even closed down my original craft blog.

I was struggling. I had a hard time with having so few followers and even fewer interactions on my page. I had taken it very personally and I felt hurt by it. I felt that I tried everything. I posted messages that it was OK to share projects that my followers were working on. I added polls, and shared things from other craft pages or groups that were related to things that I enjoyed doing and thought that others would as well. I had event ideas.

One idea in particular was to have a Craft-and-Chat. Once or twice a month we would come together and work on whatever projects we enjoyed doing, and be able to chat and share ideas or photos of our projects at the same time. I won’t say that the idea was a flop as I did have some interaction with it. It just wasn’t on the scale that I would have liked it to have been.
Note: At the time I closed down the original page, I was just shy of 100 followers.

After days and weeks of feeling lower than snake hips, I was reminded:

Nothing Worth Having is Easy

It totally changed my mindset.

A few months later, a new account was made, and ultimately a new facebook page. I was debating on keeping it unpublished for awhile, but then I thought, “How can I share my love of creativity that way? I can’t!”  So I didn’t. I also brought back my blog.

Do I have a ton of followers now? No. It’s slow going, but I am not going to let that stop me from pursuing my dream. I can’t take everything personally. It takes time, sometimes a very long time, to reach goals and to become a bigger community.

YES, it’s a struggle to go from idea or dream to something BIGGER, something MORE. Maybe you’re in a similar position. Don’t do what I did. Don’t give up when things don’t go according to plan. Don’t give up when things look dismal. That’s the time to keep going, persevere, and push ahead.

I’ll end with this:

DREAM BIG!
And if you’ve lost hold of it, DREAM BIG…AGAIN!

God bless you!

Decorating Practice and a Fake Cake

Several weeks ago I joined a couple of groups dedicated to Cake Making and Decorating. I’ve been asking a lot of questions and viewing many instructional online videos. I even started looking at different cakes on Google.

Then I saw it. The perfect cake for my husband. And yet, it wasn’t a cake at all, or was it? (More on that later). So I made up my mind that I was going to make it, but I needed to practice some piping techniques.

I gathered more information from questions and videos, I actually wrote down some notes. One of the ladies in a group for beginner cake decorators asked what could be used in the place of icing to practice piping with. (Wow! I had wondered that same question). It was suggested that you could use mashed potatoes, Crisco shortening, or creamy peanut butter.

My choice? Mashed potatoes.

Why? Well, because. We had a few packages of potato flakes (cardboard potatoes) and my husband won’t eat them. He says they taste like cardboard. So I figured I’d get some use out of them then.

On Friday, I spent some time practicing with my “Potato Icing”.

It’s been about 17 years since I’ve picked up a cake decorating bag and icing tips, and boy was I nervous…

I used a few of the practice sheets to practice on my Wilton practice board.

Stars:

Practice using Star tips

Outlining & Filling In:

Fish Outline

Filled in with Stars and Decorative Scrolls

Half piped Cupcake Outline

I was getting anxious about making the surprise cake for my husband. We had already bought the ingredients, so I made a practice run.

Introducing, my version of an “April Fools Meatloaf Cake”.
Recipe can be found here.

Light green ‘icing’ for the star border and lettering. White ‘icing’ for the base.

I didn’t have any garlic cloves, so I used a Papa John’s special seasoning packet. I probably could have used plain garlic powder, but then I would have had to grind the black pepper by hand (which would have taken longer).

The two cake layers are meatloaf and the icing is mashed potatoes.
It’s a little hard to tell, but I did add some green food color to some of the potatoes to try and off set it. I should have used more, but by they time I was icing the cake my hubby and kids were hungry.

My kids knew what I was up to and kept coming into the kitchen to check my work. I had to keep telling them to get out. (laughing)
Hubby was surprised when I brought dinner to the table. He sliced the cake for everyone. He even had seconds, and thirds… so apparently he liked it.